Using Sequelize with YugabyteDB
This document describes how to use Sequelize, a promise-based Node.js object-relational mapping (ORM), with YugabetyDB.
Prerequisites
Before you can start using Sequelize, ensure that you have the following available:
-
YugabyteDB version 2.4 or later (see Quick Start).
-
Node.js (see Downloading and installing Node.js).
-
A sample project for use with Sequelize. If you do not have a project, you can create it by executing the following commands:
mkdir demo_project && cd demo_project mkdir node_modules touch demo.js -
A YugabyteDB-specific Sequelize package called sequelize-yugabytedb. You can install this package by running the following command from the
demo_projectdirectory:npm install sequelize-yugabytedbCurrently, the
sequelize-yugabytedbpackage extends Sequelize version 6.6.5.
Using Sequelize
To start using Sequelize with YugabyteDB, add the following code to the demo.js file:
const { Sequelize } = require('sequelize-yugabytedb');

//first three arguments are database, username, password
const sequelize = new Sequelize('yugabyte', 'yugabyte', 'yugabyte',
  {
    host: 'localhost',
    port: '5433',
    dialect: 'postgres'
  }
)
// define a model with "customer" modelname
const Customer = sequelize.define('customer', {
  id: {
    type: Sequelize.INTEGER,
    primaryKey: true
  },
  name: {
    type: Sequelize.STRING
  },
})
//create "customers" table
Customer.sync({force: true})
.then(function() {
  //insert 2 rows into the table
  Customer.create({id: 1, name: "Bob"})
  Customer.create({id: 2, name: "Tom"})
})
To run the application, execute the following command:
node demo.js
Testing the code
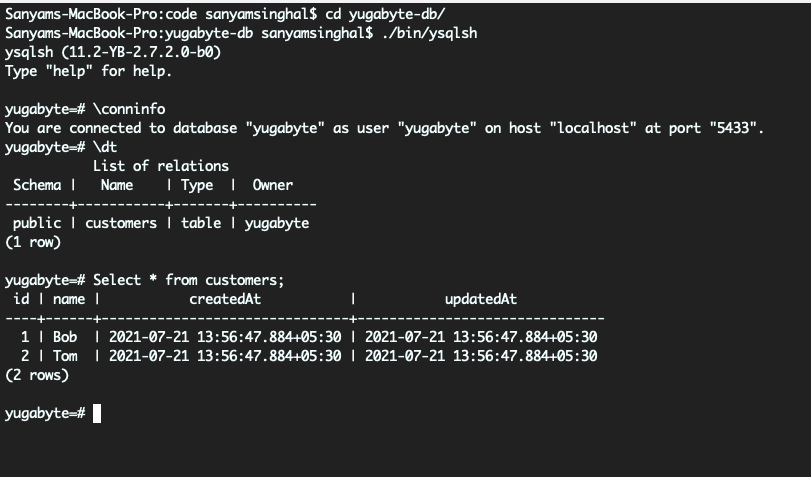
You can verify the code execution by looking for the changes inside the database, as follows:
-
Navigate to your YugabyteDB installation directory by running the following command:
cd /<path-to-yugabytedb> -
Run the ysqlsh client by executing the following command:
./bin/ysqlsh -
Obtain the list of all the tables in the database by executing the following command:
\dt -
Check if rows have been inserted into the table by executing the following:
SELECT * FROM CUSTOMERS;
The following illustration presents the output:

The createdAt and updatedAt timestamp columns have been added automatically by Sequelize.