Chinook sample database
The Chinook sample database for a digital media store can be used to explore and learn YugabyteDB.
You can install and use the Chinook sample database using:
- A local installation of YugabyteDB. To install YugabyteDB, refer to Quick Start.
- Using cloud shell or a client shell to connect to a cluster in YugabyteDB Managed. Refer to Connect to clusters in YugabyteDB Managed. To get started with YugabyteDB Managed, refer to Quick start.
In either case, you use the YugabyteDB SQL shell (ysqlsh) CLI to interact with YugabyteDB using YSQL.
About the Chinook database
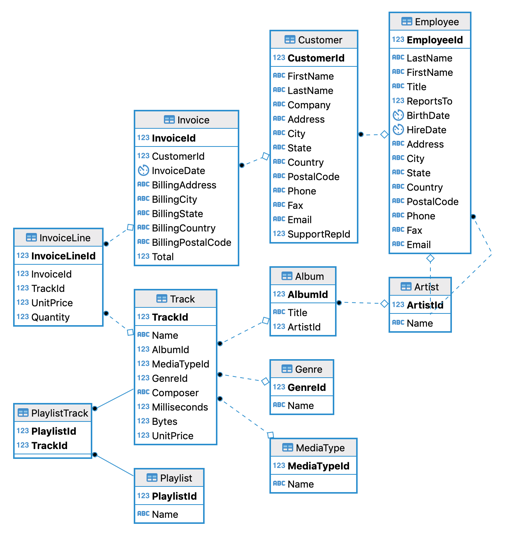
The Chinook data model represents a digital media store, including tables for artists, albums, media tracks, invoices, and customers.
- Media-related data was created using real data from an Apple iTunes library.
- Customer and employee information was created using fictitious names and addresses that can be located on Google maps, and other well formatted data (phone, fax, email, etc.)
- Sales information was auto generated using random data for a four year period.
The Chinook sample database includes:
- 11 tables
- A variety of indexes, primary and foreign key constraints
- Over 15,000 rows of data
For details, here's the entity relationship diagram of the Chinook data model.

Install the Chinook sample database
The Chinook SQL scripts reside in the share folder of your YugabyteDB or client shell installation. They can also be found in the sample directory of the YugabyteDB GitHub repository. The following files will be used for this exercise:
- chinook_ddl.sql — Creates the tables and constraints
- chinook_genres_artists_albums.sql — Loads artist and album information
- chinook_songs.sql — Loads individual song information
Follow the steps here to install the Chinook sample database.
Open the YSQL shell
If you are using a local installation of YugabyteDB, run the ysqlsh command from the yugabyte root directory.
$ ./bin/ysqlsh
If you are connecting to YugabyteDB Managed, open the ysqlsh cloud shell, or run the YSQL connection string for your cluster from the yugabyte-client bin directory.
Create the Chinook database
To create the chinook database, run the following command.
yugabyte=# CREATE DATABASE chinook;
Confirm that you have the chinook database by using the \l command to list the databases on your cluster.
yugabyte=# \l
Connect to the chinook database.
yugabyte=# \c chinook
You are now connected to database "chinook" as user "yugabyte".
chinook=#
Build the tables and objects
To build the tables and database objects, run the following \i command.
chinook=# \i share/chinook_ddl.sql
You can verify that all 11 tables have been created by running the \d command.
chinook=# \d
Load the sample data
To load the chinook database with sample data, you need to run the SQL scripts.
First, run the SQL script to load the genres, artists, and albums.
chinook=# \i share/chinook_genres_artists_albums.sql
Next, run the SQL script to load the songs.
chinook=# \i share/chinook_songs.sql
Now verify that you have data by running a simple SELECT statement to pull some data from the Track table.
chinook=# SELECT "Name", "Composer" FROM "Track" LIMIT 10;
              Name               |                          Composer
---------------------------------+------------------------------------------------------------
 Boa Noite                       |
 The Memory Remains              | Hetfield, Ulrich
 Plush                           | R. DeLeo/Weiland
 The Trooper                     | Steve Harris
 Surprise! You're Dead!          | Faith No More
 School                          | Kurt Cobain
 Sometimes I Feel Like Screaming | Ian Gillan, Roger Glover, Jon Lord, Steve Morse, Ian Paice
 Sad But True                    | Apocalyptica
 Tailgunner                      |
 Tempus Fugit                    | Miles Davis
(10 rows)
Explore the Chinook sample database
That’s it! Using the command line or your favorite PostgreSQL development or administration tool, you are now ready to start exploring the chinook database and YugabyteDB features.