Deploy a GraphQL application
This page demonstrates how to deploy a GraphQL application on Hasura Cloud and YugabyteDB Managed using Hasura's Realtime Poll sample application. This application is built using React, powered by the Hasura GraphQL Engine, and backed by a YugabyteDB Managed YugabyteDB cluster. It has an interface for users to cast a vote on a poll, and results are updated in an on-screen bar chart in real time.
Prerequisites
The example has the following prerequisites:
-
You have created a cluster on YugabyteDB Managed. For instructions, refer to Create your cluster.
-
You have created a Hasura project and connected it to your cluster. For instructions, refer to Connect Hasura Cloud to YugabyteDB Managed.
You will also need the Admin Secret of your Hasura project.
For details on using Hasura Cloud, refer to the Hasura Cloud documentation.
-
You have installed Hasura CLI. You apply database migrations to the Hasura project using the Hasura CLI. To install Hasura CLI, refer to Installing the Hasura CLI.
Download the Realtime Poll application
The Realtime Poll application is available from the YugabyteDB GraphQL Apps repository.
$ git clone https://github.com/YugabyteDB-Samples/yugabyte-graphql-apps.git
$ cd yugabyte-graphql-apps/realtime-poll
Set up and configure Realtime Poll and apply migrations
You need to configure the Realtime Poll application to use the Hasura Cloud project domain and Admin Secret:
-
On your local computer, navigate to the
hasuradirectory in the realtime-poll directory.$ cd hasura -
Edit the
config.yamlfile by changing the following parameters:- Set
endpointto the domain of your Hasura project; for example,https://yb-realtime-poll.hasura.app. - Set
admin_secretto the Admin Secret you copied from the Hasura Cloud project dashboard.
- Set
To migrate the tables and views to the Yugabyte database:
-
Navigate to the
migrationsdirectory in thehasuradirectory.$ cd migrations -
Rename the
defaultdirectory to the Database Display Name you assigned to your YugabyteDB Managed database in the Hasura project console; for example, if your Database Display Name isyb-realtime-polldb, use the following command:$ mv default yb-realtime-polldb -
Return to the hasura directory and apply the migration. For example, if your Database Display Name is
yb-realtime-polldb, use the following command:$ cd .. $ hasura migrate apply --database-name yb-realtime-polldbThis creates the tables and views required for the polling application in the database.
Finally, update the Realtime Poll application with the Hasura Cloud project domain and Admin Secret:
-
Navigate to the
srcdirectory in the sample application directory.$ cd realtime-poll/src -
Edit the
apollo.jsfile by changing the following parameters:- set the
HASURA_GRAPHQL_ENGINE_HOSTNAMEconstant to the domain of your Hasura project; for example,yb-realtime-poll.hasura.app. - set the
hasura_secretvariable to the Admin Secret you copied from the Hasura Cloud project dashboard.
- set the
Configure the Hasura project
First, expose the tables and relationships to the GraphQL API:
-
Navigate to the Data tab in your Hasura Cloud project console. The tables from the Realtime Poll application are listed under Untracked tables or views.
-
Click Track All and OK to confirm to allow the tables to be exposed over the GraphQL API.
After the console refreshes, Untracked foreign-key relationships lists the relationships.
-
Click Track All and OK to confirm to allow the relationships to be exposed over the GraphQL API.
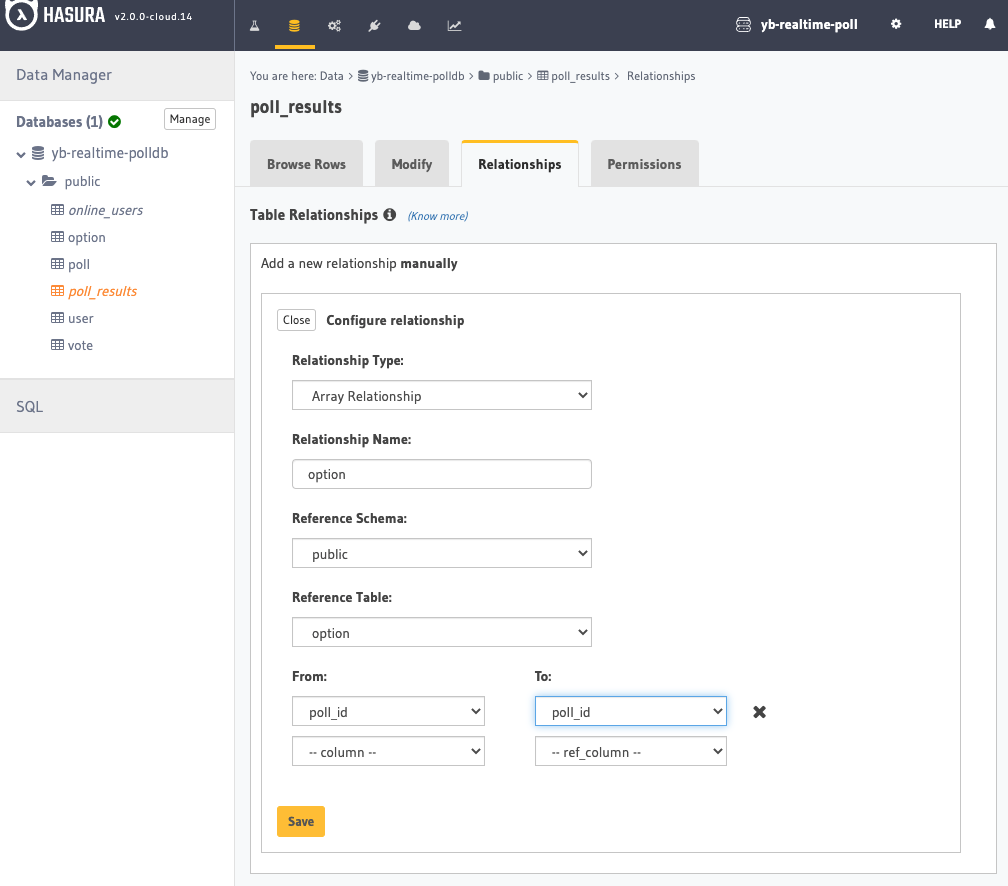
Next, add a new Array relationship for the poll_results table called option as follows:
-
Select the
poll_resultstable. -
Select the Relationships tab.
-
Under Add a new relationship manually, click Configure.
-
Set the following options:
- Set Relationship Type to Array Relationship.
- In the Relationship Name field, enter option.
- Set Reference Schema to public.
- Set Reference Table to option.
- Set From to
poll_idand To topoll_id.

-
Click Save.
Run Realtime Poll
To run the Realtime Poll application, on your local computer, navigate to the application root (realtime-poll) directory and run the following commands:
$ npm install
$ npm start
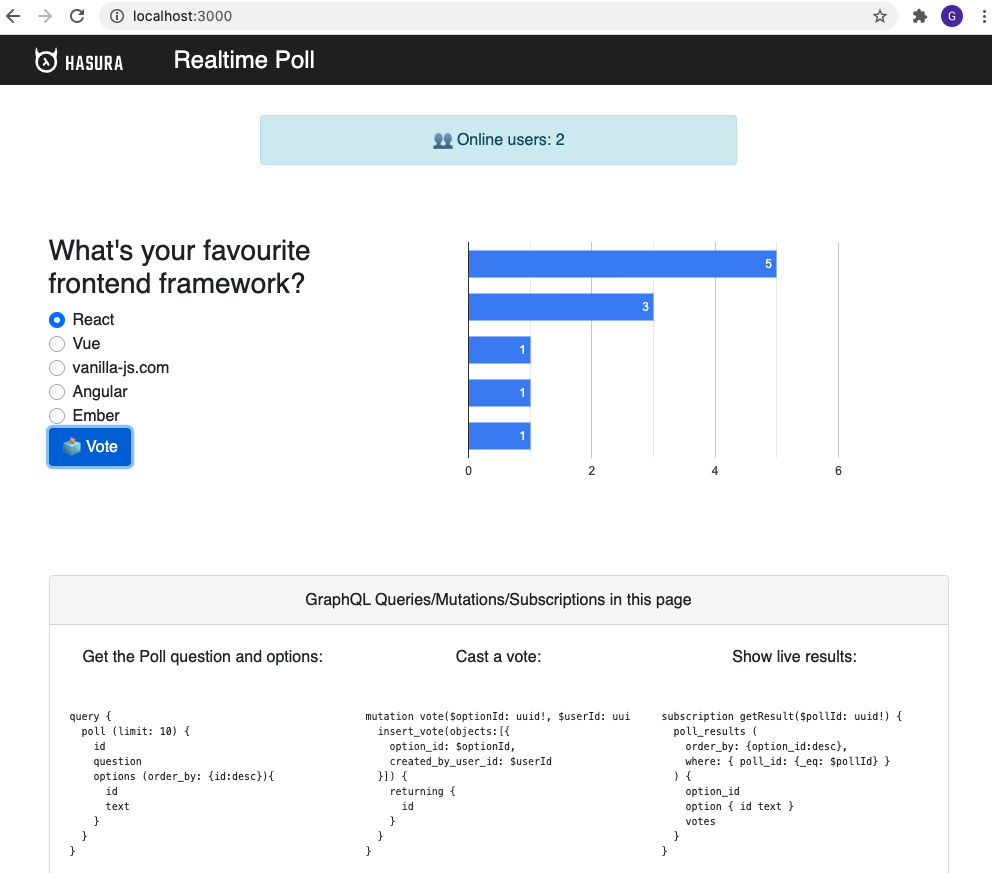
Realtime Poll starts on http://localhost:3000.
Open a second browser tab, navigate to http://localhost:3000, and cast a vote for React. The chart updates automatically using GraphQL Subscriptions.

To verify the data being committed to the YugabyteDB Managed instance, run the following subscription query on the API tab of the Hasura Cloud project console to retrieve the Poll ID:
query {
  poll (limit: 10) {
    id
    question
    options (order_by: {id:desc}){
      id
      text
    }
  }
}
Note the Poll ID, then run the following query, setting the pollID GraphQL Query Variable to the Poll ID you retrieved using the previous query:
subscription getResult($pollId: uuid!) {
  poll_results (
    order_by: {option_id:desc},
    where: { poll_id: {_eq: $pollId} }
  ) {
    option_id
    option { id text }
    votes
  }
}
Set the $pollID variable in the Query Variables field.
{ "$pollId" : "98277113-a7a2-428c-9c8b-0fe7a91bf42c"}